When I decided to do this project a few days ago, it was all I could do to wait for the weekend to go shopping and have the time to work on my first project. Finally, Friday came around and I spent a few hours after work combing the racks of Fulton's Salvation Army and Baldwinsville's Thrifty Shopper. I made sure to keep within my mental checklist for the first few projects: look for nice colors, simple designs, fantastic buttons, etc. Every single item I chose was a dress - I thought I'd start "easy" with items with lots of fabric attached. Safe to say, I found plenty for my first few projects (and a few things I regret not buying like a fantastically designed sweater and an accent chair for 6 bucks!)
First up: blue dress. I've been very into blues and whites lately, especially together. Stripes or dots, you name it and I've looked at it with all intention of purchasing it. I found this dress and knew I had to bring it home (for $2.50!)


Sad shoulder pads! I feel like a lot of the items I'll find at thrift stores will have shoulder pads - maybe I should start a collection of some sorts? I also cut off the belt; I did this for no particular reason other than I was rather enjoying my new seam ripper.
Next, I noticed that there was a natural seam around the waist and thought that was rather convenient! So I cut it in half, using the existing seam as a guide.
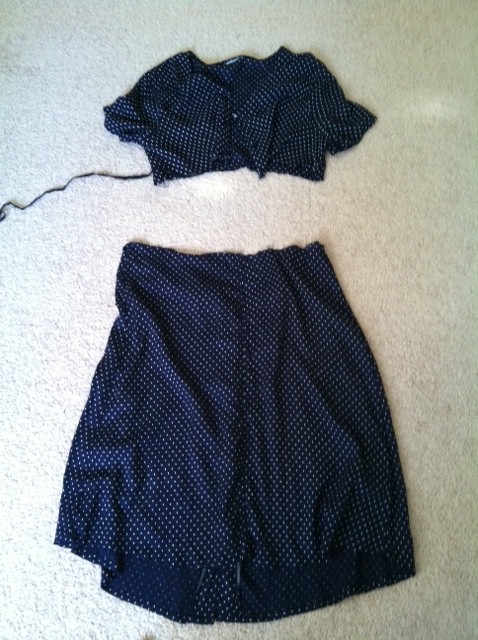
It was also at this point that I realized the original dress was longer in the front than it was in back - this seemed pretty backwards to me, but I'm not gonna judge. My original hope was to have the buttons (originally in the front of the dress) on the side so it'd be easier to hook when it was finished. As doing this created a certain assymetrical look - and not a flattering one - I had to flip it around and make the original front of the dress the back, thus making it longer in the back than it was the front. You know... like typical skirts. I then proceeded to sew a seam from the bottom of the skirt, keeping a small slit so it remained a-line, up to the first button, with hopes of the first button being my skirt closure. This actually took me two attempts. The first time I sewed the seam, I forgot about the buttonholes, so when I put it on the first time the buttonholes created quite the "peek a boo" every 2 inches or so. The second time was a charm!
All that was left at this point was just to make a top seam. I folded over the top about a half inch and sewed that down, then folded it over again and sewed it down again. Why did I do this? Not sure. My brain was thinking "if I did this twice, maybe it'll take longer to fall apart". As you can see, my confidence was stellar at this point. After doing this, I realized there was quite a gap from my closure top button to the top of the skirt, so I took one of the buttons that I removed from the dress when I sewed it up and sewed the button to the top of the skirt. It was at this point that I realized I had no idea how to make buttonholes. Whoops.
This is where I'm not proud. I knew I should have googled it, or at the very least looked it up in that book that came along with the sewing machine. But, I followed my "the book is all the way downstairs!" mentality and just cut a hole. That's right! I got out my handy scissors and I just stuck it there, somewhere around the opposite side of the new button. I then hand-sewed around the edges of the hole a few times so it wouldn't fray or rip when I buttoned it up. For now, the hole seems to be doing okay, and luckily the button fits inside of it (another thing I should have thought about before I sewed all around it. Thank you, fate, for making me lucky this time.) So I donned the skirt and it fit. And it stayed. And it isn't half bad!

Few notes on my mental checklist: 1) Learn how to do buttonholes. 2) Learn how to take a decent picture of myself that isn't a typical Facebook photo through a mirror. I may have to rope the husband into helping me on this one. 3) Get comfortable with being in pictures - I seriously hate being the subject.
Next up: I have a fantastic pair of grey boots that have not been debuted quite yet and I'm
What are your thoughts? Was I "sew" thrifty, or was it something to be desired?
I would've liked to see the button hole "peek-a-boo," just sayin'.
ReplyDeleteI would've also liked to see you in the original dress- you know, for pure scientific satisfaction of "before and after" (and SHOULDER PADS!! HUT HUT HIKE!)
I'm getting there - still not all that comfy with being the sole subject of pictures, but unfortunately at some point it'll be inevitable ;)
Delete